• Facebook
  • Pinterest
  • Instagram
  • YouTube
  • LinkedIn
  • Skip to secondary menu
  • Skip to main content
  • Skip to primary sidebar
  • Skip to footer

Tina's Dynamic Homeschool Plus

Activity, Change, Progress

  • HOME
  • How to
    • Preschool
    • Kindergarten
    • Elementary
      • Geronimo Stilton Books
    • Middle School
    • High School
      • Science 
  • Planner
  • Lapbooks
    • Trioramas
    • History Games
    • LEGO
  • Shop
  • GET STARTED NOW!
    • Learning Styles
  • 7 Step Planner
    • Free Student Planner
    • Free Home Binder
  • Unit Studies
    • Creation to Ancients
      • Mesopotamia
    • Middle Ages to Reform
    • Exploring to Revolution
    • World Wars to Today
    • Science
  • Curriculum
    • More Unit Studies
    • Geography
    • Writing PreK to 12th
    • Free Art Curriculum
  • BootCamp
    • Resources
      • Ultimate Unit Study Planner

Search Results for: planner

5 days of a homeschooling co-op convert-day 5: cherished co-ops

June 3, 2013 | Leave a Comment
This post may contain affiliate links. For more information, please see my full disclosure policy.

{Warning: Picture Overload Again. This got long because I have many pictures & memories we have created so far that I want to share with you. So I am scattering them throughout this post.}


day 5 A Cherished Co-op

Nobody wants to be part of a co-op that does not flourish. It flourishes not because of the work of other people but because each leader and all the members work at creating an atmosphere for learning and lasting memories.

Co-ops can go from cherished to a flop if you don’t have communication, a clear purpose on the existence of the group, a few clear cut ground rules, realistic ways to solve the costs and expenses of the group, and leadership with joy.

I got ask to share some of the ground rules we have. Giving you some of my thinking and experience behind the rules, I hope helps you to make the right rules for your co-op.


Don’t overwhelm new members with rules but a few well chosen rules keeps expectations clear.  It should take you longer to read this post than it should a new member to read the list. Be precise and clear so that your group attracts the members that you want in your co-op.


About Rule 1.  Our group is private and you have to know somebody before you join. We feel this keeps drama down to a minimum. Normally a friend that is already having fun in the co-op can be your best advocate if things go awry or if the guidelines are not understood by a new member.

You think it’s a given that participation is required, but you’d be surprised. There are a number of people who join a group and like reading the group’s email behind the computer, but shows up rarely because of one excuse or another. If the very purpose of your co-op is to socialize, like ours is, then you want active families. Our co-op is private because we would rather grow with few active participants than many who are not. It didn’t’ take long for word to get out and our group grew fast in a few years.

About Rules 2, 3 & 9.  We didn’t want a group that was drop off and go. The purpose of a our co-op is so that families participate together. We have the rule that a guardian or parent has to be present. We don’t care if families agree between themselves that another mom can bring a child, they have to contact us first to approve this. Things happen like sickness and pregnancy so we try to be kind and make exceptions to our rule where we can.  They are few and far between.

This rule may sound rigid but when you are responsible for what goes on at a co-op, we take it seriously. Children grow into teens with natural feelings for the opposite sex, a child may have unknown allergies or behavioral problems and if anything goes wrong at a co-op, it is wise for a parent to always be there.

Also, we make it clear that extra children couldn’t come that were not approved. Again, this keeps drama in your co-op down to a minimum because some mom decided it was good to bring an extra 5  kids because she felt they needed to come. This doesn’t mean they can’t, just address it whether you want that or not. We feel it is rude to do this when one homeschool mom has worked hard on preparing lessons and crafts and then doesn’t have enough because extra children showed up.  Like I have mentioned before, communication is the vital life blood of a thriving co-op.

We have a real simple rule about participation and that is you have to come at least to 1 event. Of course our members came to many normally after they attended one, but this shows we are serious about participation.

About Rules 4 & 5.  Having one pay period per year works better for us because it makes for less time managing and more time for us to plan and have fun. Keep the collecting money process down to the shortest time possible.

Too, though it may be convenient for members to pay by pay pal, we don’t accept it because pay pal charges a fee. Even a small fee is too much when every penny counts. It may be more hassle to send it snail mail, but you get every penny.  Make it easy on members to pay, but not at the expense of having less money when you probably don’t charge much to begin with.

Dress can be a sensitive subject. Some of our members live in more fashion conscious areas and others do not.  We don’t allow members to impose their views on others.  Too, we didn’t make a laundry list of what is right and wrong because we don’t want to impose our views either.

I happen to love clothes, makeup, especially bright red lipstick and all the accessories, but if another person’s view made them dress differently, that is fine too.

Our leaders are not narrow minded, but try to be open to many styles while still being modest. We only have a few rules like no real short shorts , low cut blouses and no T-shirts for boys or girls that had suggestive language. When something like this came up and we saw something we didn’t agree with, we handled it privately with the member and tried to be kind and loving. It did happen quite a bit because everybody thinks differently, but we always seem to resolve it when we are kind.

About Rules, 6, 7 & 8.  We have to know something about our members before they received an invitation to join. Answering serious questions first before they got on the group kept us from having to dismiss  members after they were on the group. In other words, joining a co-op should be a 2 way interview process. They should be asking what you offer and how you run things and you should be “interviewing” them.

Besides the general questions about the basics of address and kids, we wanted to know how many children they were schooling. Also we wanted to know what their views are on homeschooling. We ask this not to be nosey, but if they have kids that were in trouble in public school and it’s because they have been lax in parenting, we don’t really want that trouble to follow them to our co-op.  Their reply privately to you as group leaders reveals their heart and what kind of member they will be.

One really important question on our questionnaire is “Have you or any of your family members been accused of being a pedophile?”  In our co-op, we don’t care if they have been cleared innocent or not, our group is private and we can make rules like nobody accused, whether presumed innocent or guilty can be part of our group.

Sure they can reply how they want to but two things happen here: 1) The family knows your serious about watching your group 2) You have an answer to the group if the horrible thing ever happens where a pedophile enters your co-op.  Having this questionnaire shows you have tried to do your job well in protecting the group and have background information on everybody in the group.

There are many ways to communicate to members. When a group is new and not many members, it is easier to communicate through phone. The larger the group grows the more you need to stay balanced and not forget your own children’s education. A better way of communication is needed. Sure, it is  easy to text but it can be rude when your group is larger and because you may be in the middle of school too.

Our main method of communicating to members is using a yahoo group. If I talked to all of our members or texted them,  I would not get anything done in my home. Yahoo groups are good for planning and answering and setting up polls to see who is coming.

One feature we have that is a *must* is that emails are set to *individual* emails. We are not going to email important notices and then be read or seen days later. If your group gets too many “chatty” emails, then moderate the group. This has been our time tested method and it is still great today.

We also have geographical limits for our members.  We live in a big city and near Houston so we want to be sure our members can make it to field trips and events.  Again, this lets the group know you are serious about participation and your group is not just for online chatting.

About Rule 10. You think it goes without saying in a homeschool group you don’t allow bullies and cussing but you’d be surprised. Some parents make excuses for their children’s behavior. Again, handling it privately as each occurrence comes up kept drama out of the co-op.  Sometimes we wouldn’t have to dismiss members because after we talked to them about their children’s behavior, they got defensive and they never came back. This happened just a few times. The other parents appreciated being told because they may have been busy talking and visiting. Understanding that children can be children goes a long way too in not judging others so harshly because I recognize that my kids are subject to misbehaving too.

We happen to like toddlers and preschoolers moving around and don’t expect them to sit and be quiet like older children. They are suppose to move. Older children learn that a co-op though should be fun is still school.

Spend time thinking about guidelines and your group will have many lasting memories because each member cherishes it. My sons have made life-long friends. Too, the value of seeing each other year after year gives them a sense of classmates and some as close as family.

All the work myself, Kelley and Cynthia have put into our co-op has been worth every stressing detail though we didn’t think that at the moment.

Meeting with the group is something we ALL look forward to each month and it one of the highlights of our journey.  We have more loved homeschooling friends that I ever could have imagined.

Throughout the years we have made many cherished memories of which I have shared only a few today and we plan on making more.

Are you a homeschooling co-op convert?


If you missed the other days, here is your Homeschooling Co-op 101 guide:

5 Days of A Homeschooling Co-op Convert – Day 1:Who needs one anyway?

5 Days of A Homeschooling Co-op Convert – Day 2:What are the basics?

5 Days of A Homeschooling Co-op Convert – Day 3: Coordinating the Co-op

5 Days of A Homeschooling Co-op Convert – Day 4: Co-op Core Leaders Matter


Hugs and love ya,
2012Tinasignature Updated Holiday reference pages for curriculum planner

Leave a CommentFiled Under: 3. {5 Days of . . . Blogging Series}, A Homeschooling Co-op Convert Tagged With: homeschoolco-op

Step 7. Bind It/Love it

step-1-of-the-7-step-free-homeschool-planner-tinas-dynamic-homeschool-plus
step-2-of-the-7-step-free-homeschool-planner-tinas-dynamic-homeschool-plus
step-3-of-the-7-step-free-homeschool-planner-tinas-dynamic-homeschool-plus
step-4-of-the-7-step-free-homeschool-planner-tinas-dynamic-homeschool-plus
step-5a-of-the-7-step-free-homeschool-planner-tinas-dynamic-homeschool-plus
step-5b-of-the-7-step-free-homeschool-planner-tinas-dynamic-homeschool-plus
step-5c-of-the-7-step-free-homeschool-planner-tinas-dynamic-homeschool-plus
step-6-of-the-7-step-free-homeschool-planner-tinas-dynamic-homeschool-plus

Step 7. Final Step. Organize it/Shuffle Sections/Print your Tabs before you take it to be COIL BOUND.

 Please Read Here (Under About the Type of Planner Created) Why I Do Not Suggest Notebooks or to use them for only Special Occasions

Be sure your planner is laid out in the order you like. If you followed my steps, most of it will be organized. However, you may prefer to put Day at a Glance in between each planner page or you may prefer to have a separate section for that and the same way for Journaling. You DECIDE what you like!

 Coil Binding The Only Way to Go. {hate sounding so dogmatic, but it’s true}

As far as binding, the way I liked the best is coil bind. For a few bucks more, especially if you printed your pages, it is worth the coil bind. The best reason is that the pages lay flat on my table. Too, the binding does not take as much room on the left margin.

Also, another reason is that the pages do not tear out easy.

Coil bind comes in ALL colors, red, black, white, and even purple and pink. lol. But it just depends on which office supply place you get it bound at as to selection. If you are a true adventurer you can even order ANY colored coil through a binding company and take your own color as I do sometimes.

For example a college town will carry the colors of your local college or even school. Some will just carry the basics like “black and white”.

I use to call ahead to various Office Max locations to see what is in stock before I chose my “cover” so it would all coordinate. But for bigger planners, (real thick ones) the choices are usually limited to either black or white or clear.

Cover and Back

I used to get a clear cover and then a hard back black cover to provide some support because I just didn’t really take it anywhere. That was fine. (This normally is what the average office supply worker usually recommends.) If you choose this, keep in mind you have a selection colors for the sturdy back cover as well. For example, if you choose a purple binding, you can do like a pearl iridescent back. It is very pretty :o) and clean looking, not to mention professional looking.

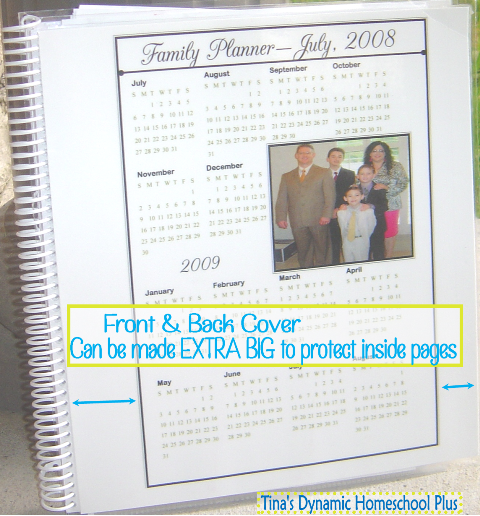
BUT my favorite trick I have learned –is to laminate the FRONT and BACK extra big. Be sure to NOT choose “thin” laminate. A thicker laminate will serve to protect your binder during the year and give it stability.

I have the office supply worker place my front page on a 11 x 11 piece of card stock. Then they laminate over the whole thing PLUS about an inch PAST my cover page. The same way for the back. The office worker laminates an 11 x 11 piece of card stock for the back.

Even though my pic below is not to scale, there is the same amount of room on both the left side and right side of my cover page as shown by the red arrows.  Rounded corners too by laminating – NO sharp corners please!

In other words, my front page of my planner is centered on this 11 x 11 piece of paper with about one inch on each side.

You will notice right away that you do not see ANY of my tabs sticking out or the inside pages as the front and back laminated this way protects all the inside pages.

Here is the pic in case this sounds like “mumbo jumbo”

Picture of Extra Large and Back Cover

Each year I decide whether  I want to make the front and back cover extra large and have it extend out out past my inside pages or just have the cover  I take up to Office Max to be laminated and be regular size with my inside pages.

You decide what you want as I am just sharing my experiences each year.

What do I accomplish this way?

1. It is more sturdier than a clear front and hard back.

2. My front calendar page is protected because it is laminated and not loose.

3. The tabs to my pages are “inside” and protected and not getting bent and caught on everything as I “transport” it or cutting me.

4. I can place my planner down on liquids such as water (I have done it before by accident) and it’s okay because the back protected any pages. Just wipe and go.

5. Did I mention your planner just can look SMOKIN’ HOT? It can even match your purse for the year. ROFL

If you need to Go Back:

Click Here for Step 1 Choose a Pretty Front & Back Cover.

Click Here for Step 2 Choose Calendars & Appointment Keepers

Click Here for Step 3  Choose Goals & Objectives

Click Here for Step 4 Choose Lesson Planning Pages

Click Here for Step 5A Just Unique Forms Just for You

Click Here for Step 5B Just More Unique Forms Just for You

Click Here for Step 5C Just More More Unique Forms Just for You

Click Here for Step 6 Personalize It


Save

Save

Step 6. Personalize It

When finished, click on the graphic to go to the next page.

step-7-of-the-7-step-free-homeschool-planner-tinas-dynamic-homeschool-plus

About Personalizing It!

tinas diy curriculum planner personalize it

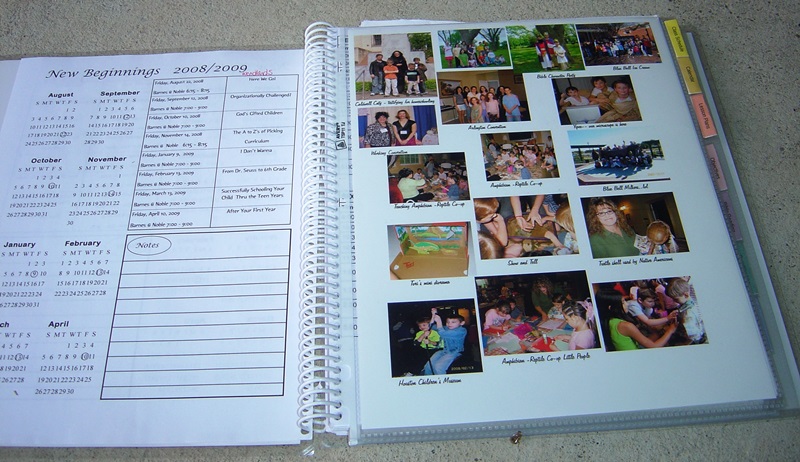
What do I mean by this? Well did you notice all the pictures I have  in my planner? Since teaching is a work of the heart, I personalized it by adding pictures of our  previous school year’s field trips, activities and special moments to remind me of what we DID accomplish the year before instead of all that we did not.

Any “organizing tool” has the ability to be cold, austere and rigid. So that is what I believe anyway..LOL So this makes it warm and inviting and PERSONAL.

Did I mention over the years the pictures make a nice collage for memories as well? Since we don’t really have time to do all things we love, like I would love to scrapbook a memory book each year but right now this will have to do. Too, in this planner you have all the “proof” of what you accomplished by adding your field trip notes and souvenirs and pictures of your co-ops, lapbooks, music recital and dance recitals. Don’t forget to add your child’s art work, drawings, greeting cards received for your work for other homeschoolers and attending/working homeschool conventions. Pretty cool uh?

Basically, I copy and paste pictures and make a collage on one page. You can do this in Word and Open Office or even Paint Net. Paint Net and Open Office are FREE.

Then I print them off on regular paper OR photo paper depending on how much I want to pay and added them inside a page protector AFTER binding the page protector in with the rest of planner. Be sure to decide where you want to place the pictures in your planner, put a page protector there to save that spot.

Add your PHOTO PAGE inside your page protector AFTER you bind it all together.

Tip to remember: You will have two pages of photos per one page protector (front and back). So be sure you have taken enough pictures to add to your binder.

Page Protectors – I put mine at the front and back instead of between lesson planning pages but IF you use the tabs I mention below which are page protectors AND tabs you might not need as many.

About Tab Dividers – Be Picky Very Picky! They are not created equal.

Don’t just buy one, make it WORK for you baby.

The Page Divider needs to serve a dual purpose if it’s going to exist in my planner and not just take up room. Choose one that is a page protector (top loading or opens from top so you can stick in pictures, lose papers or business cards,recipes,etc.) Also you can look for one that is a pocket AND a tab. Think of “storage” anyway you can get it without making your planner so bulky by adding too many plain pockets.

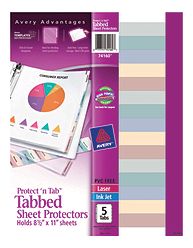
The Avery Protect ‘n’ Tab divider pages are sheet protectors with soft tabs. So the page protectors serve as dividers between sections or you can even divide the lesson planning pages monthly. Sometimes I put page dividers between months (separating out 30 lessons or so but be careful to do this if you feel it makes you seem behind because you have divided it into months).

Here are some Tab Dividers I have used and like.

77711-74160-p04t

Avery Protect ‘n’ Tab Tabbed Sheet Protectors Product No. 74160 – 5 Tabs. It also comes in 8 tabs. Did I mention the tabs are so easy to print on with the downloaded template and the colors are beautiful?

72782-16176-p01p

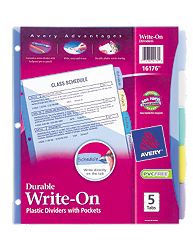
Avery Durable Write-On Plastic Dividers with Pockets Product No. 16176 – 5 Tabs. This is another divider I like because this has pockets. The only downside to this is that you have to write on the tabs but they are erasable.   The other thing I like about these tabs is that they are a pretty mix of soft colors.

21711685i_01

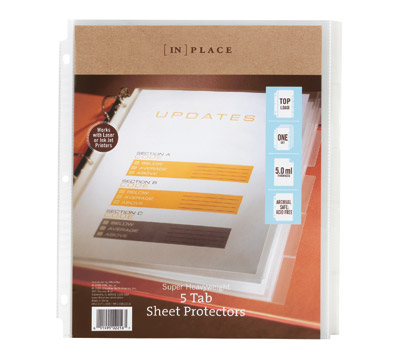
[In] Place Super Heavyweight 5 Tab Sheet Protectors 5 Tabs –  at Office Max (some Office Max stores may stop carrying the Avery Tabbed Sheet Protectors/Tabs in favor of their store brand. Fine by me as long as it is the same thing and it is. This is comparable to the Avery Protect /n Tabbed Sheet Protectors.  So look for this if you can’t find the Avery product above.

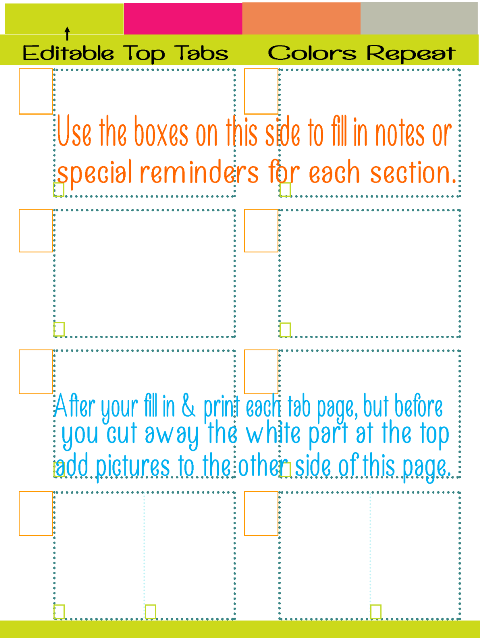
 Editable Top Tabs

Sample Picture of Editable Tabs You have your choice of buying some dividers or using these EDITABLE Top Tabs that I created.

Since the tabs I  created are EDITABLE, you can type in your own subjects or sections. The page or grid on the front of each page looks like a calendar but can be used for anything from reference to date tracking or notekeeping. I have instructions on the download on how to use them and set them up but I thought I would add a few thoughts here too.

The colors are lime green, hot pink, orange crush and gray. Just print off as many as you need for your planner and repeat the colors until you get all the sections you want divided.

After you type in the subject or topic on each divider page, you will want to use the back side for something too. I put pictures of our co-ops and field trips on mine. Remember you will need to bump your pictures down some  since you have the tab at top. After you add pictures or what ever you want on the back side of the divider page, then cut away the white part that you are not using.

In other words each page will need to have the white area at the top ONLY cut away where the tab is not. Do NOT cut the sides. The width is needed for binding. Only cut the white area away at the top and all the tabs will line up nicely as you place them in the planner.

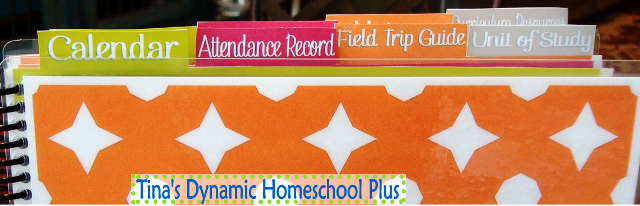
Tab Top Picture Planner

It is important if you use these tab tops that you make sure your guy or gal that binds it remembers that they need to stick out at the top because the page will be short. They may give you hassle, but it can be done.

 Download Editable Top Tabs Here.

 What To Put On Tabs?

What to put on your tabs? I have used various names on my TABS over the years depending on what I need from my planner that year. Here are a couple different lists of generally what I have used each year and in the order they are in my planner.

Even though attendance is not required here in Texas, I do this about every 2 years to hold myself accountable and keep a “pulse” on how much we are actually homeschooling for a year.

 Sample One – One year from my planner. I used tabs where I could divide all the kid’s work BUT by months.

Attendance Chart

High School

Calendars

Objectives

July – June (1 tab for each month) I prefer to have my tabs reflect each month so I can find it easier in my planner instead of JUST “Lesson Plans”

Reading List

Notes

 Sample Two – Another year from my planner. I used tabs where I could divide all the kid’s work BUT by kids, not months. Where I have Child One I put the child’s actual name.

Calendar

Individual Child’s Reading Logs

Child One (name) Lesson Plans

Child Two (name) Lesson Plans

Child Three (name) Lesson Plans

Memory Work

Reading List from (Another Source like WTM or Veritas or Ambleside on line. This helped me to see choices in case what we picked out we didn’t like)

Photo Album (Instead of putting pictures throughout my planner like I do now, a few years I add a separate section for them. You may like this better)

Teacher’s Master Schedule (This helps me to see which kid I am suppose to be working with on which day. )

Notes

 Sample Three – Another year from my planner, I used tabs where I wanted to include a list of skills for referral that year. Also, teaching Pre-k and K requires easier lesson plans and separate than older children since those grades you can mostly teach by themes. So Lesson Plans were for my oldest children and Theme Units for my youngest child.

Calendar

Pre-k Skills Check List

2nd Grade Skills Check List

4th Grade Skills Check List

Pre-k – Theme Units

Don’t Forget to Personalize It By Also Adding Pockets

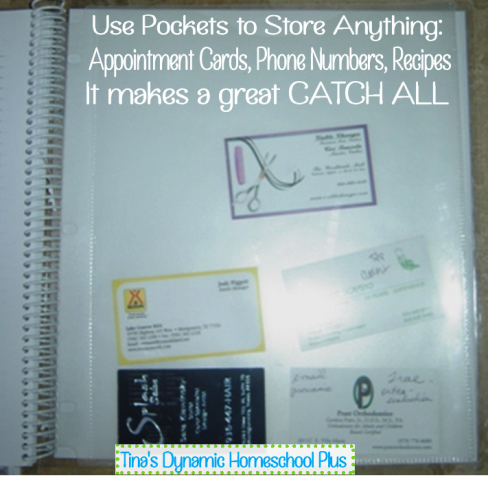
One Very Stiff Page Protector or Pocket – I usually put this at the very back of my planner. I use this pocket to store recipes I get if I am on a field trip visiting with other homeschool moms, business cards, my to-do list, bills for music lessons,etc. I left some cards in there and didn’t entirely clean it out for the year so you could see. Since this pocket gets used more often, I wanted something more sturdier.


Pocket Part for Planner

I have used half pockets before but small slips of paper where may be I had written another mom’s email or address that I need to contact has fallen out. Since this a page protector, that doesn’t happen. But everything goes here and I clean it out from time to time. Some of the business cards stay there like my son’s orthodontist so I can get the number quickly before I add it to my cell phone…Make sense how I use this pocket?

step-7-of-the-7-step-free-homeschool-planner-tinas-dynamic-homeschool-plus

If you need to Go Back:

Click Here for Step 1 Choose a Pretty Front & Back Cover.

Click Here for Step 2 Choose Calendars & Appointment Keepers

Click Here for Step 3  Choose Goals & Objectives

Click Here for Step 4 Choose Lesson Planning Pages

Click Here for Step 5A Just Unique Forms Just for You

Click Here for Step 5B Just More Unique Forms Just for You

Click Here for Step 5C Just More More Unique Forms Just for You

Save

Save

Save

Step 5b. Choose MORE Unique Forms JUST for You

You’ll love the editable grading sheets, grade keeper, student and teacher schedules, field trip tracking guides and more for your homeschool planner.

[Listing forms at the top of this page will help you to locate more quickly what you want and scroll down to that number.]

11. Grading Sheets/ 12. Grade Keeper/ 13.Class & Teacher Schedules/14.Kindergarten Evaluation Sheet/ 15. Preschool Progress Report/ 16.Student Monthly Progress Report/ 17. General Weekly Planning Forms/ 18. Multiplication Chart/ 19. Field Trip Tracking Guide/ 20. Field Trip Planner.
step-5c-of-the-7-step-free-homeschool-planner-tinas-dynamic-homeschool-plus
Homeschool Planning Forms

11. Grading Sheet. Editable.

Purpose of Form: If you live in a country or state where a grade is required or if you want to keep grades because it gives your child a sense of accomplishment, this is the form. –  Editable Too!

Like all my forms and to help along in organization this form too has  subjects that are covered from Pre-K to High School. However, there is plenty of room to “tweak” the subjects for each child.

The only difference between the forms (which is really the same form) is that one you decide the grading scale and the other one I provide a very common grading scale.

Curriculum Pages for Planner.

I have provided an example of how to get the most out of my grading sheet and it will help you to understand it better.

My goal too in providing a grading sheet is not to give you a BUNCH of blank lines (pleazzzzzzzzzzz) that is of no help to you, but to put enough information on the form so that you see what the basic subjects are plus enough flexibility that you can make it work for you.

The form does have 3 children on one page. It’s not that I like the number 3  (lol) but that is about how many spaces fit nicely on one page.

This form is EDITABLE or you can simply print off and fill out by hand if you choose to.

SAMPLE FORM TO STUDY

Homeschool Grads

This free form comes in 3 different styles in this one big free download on this page.

1. Editable Records for 3 Students’ Grades WITH A Grading System Provided For You

2. Editable Record for 3 Students’ Grades and You Provide Your Own Grade System.

3. Editable Record for 1 Student And You Provide Your Own Grade System

12. Grade Keeper. Editable.

 Purpose of Form: The purpose of the grade keeper is for you to either keep grades on one page for the year OR to track specific major assignments, tests and projects perhaps for an older child, or for states like New York that have more stringent laws for recording grades. It is one child per page. You decide. One page has the subjects typed in for you and the other page is completely editable.

This form comes in two different styles in this one big free download on this page.

  1. Editable Page 1 Per Student and You Fill in Projects, Test or Subjects or Any Activity that you need to Track
  2. Editable too but has subjects filled in for you. 1 Page per Student.
Homeschool Grade Keeper | Tina's Dynamic Homeschool Plus

13. Student and Master Teacher’s Schedule. Editable.

Purpose of Form: To help student & teacher to manage time; Understand clear expectations of what subject you want him to be working on and at what time; To help teacher see what each student is suppose to be working on during any given period. The Teacher’s Schedule is to help you also schedule personal time for each child or for a younger set of children or older set of children.

About this form: You cannot expect your child to learn to balance his time or track it if we as teachers don’t provide a visual expectation of their class schedule. This will go a long way in avoiding head butting because you have taken the time to put your expectations to “pen”. Also, if you have interruptions in your day, you have a visual map of how you can give personal time to each child by using the Teacher’s Schedule.

Here is a picture with some of my notes on how to fill out the student schedule.

Sample of a Student Schedule to Help You Plan

Homeschool Class Schedule

Free Editable Homeschool Teacher’s Schedule

About the Teacher’s Schedule.

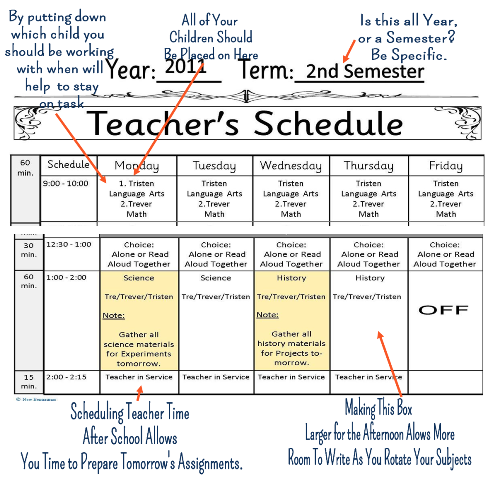
This has to be one of my very favorite organizing forms because it truly keeps me on task. It is what I call the MASTER SCHEDULE or the Teacher’s Schedule. By one glance I can tell which child I am suppose to be working with and on what subject.

Guess what ? It saves me money and tons of grief {lol} It saves me grief because I don’t buy lots of curriculum or have grandiose ideas of what I can actually accomplish in the day or worse yet, not get science or history in for the day because I did not balance my day correctly.  It is ALL written out. Schedule first all your subjects, plan for the day and time you give 1:1 to each child and it will  balance your day over the course of your homeschooling journey.

Not only did you “map” the schedule for your child, but you have an overview of where you plan to fit in all your children for the day. By putting  them individually in on the form or by groups (younger set of kids or older set of kids) this will provide the flow to your day.

I prefer to make new schedules for each term or if I use a different curriculum. This will always keep me accountable because I may need to re-do my schedule to be sure I am fitting in all of my children and giving them equal time when it comes to each child’s weakness.

Copy of My Schedule for 1 Year to See How to Use It. (Yes I’ve been refining this free homeschool planner for years.

Homeschool Teacher | Tina's Dynamic Homeschool Plus

My Notes on the Teacher’s Schedule.

Sample Teacher's Schedule 6.3.2013 TDHP

14. Kindergarten Evaluation Sheet.

Purpose of Form. Use this form anytime during the year or as a “readiness” for Kindergarten to gauge your child’s progress.

Homeschool Kindergarten

15. Preschool Progress Report.

Purpose of Form: More than any other time in our journey, we want to be sure we are starting out right. This preschool progress report helps to chart some of the milestones you will want to look for in your child.

Homeschool Preschool

  16. Student Monthly Progress Report.

Purpose of Form: This form can be used to make monthly evaluations for any child age K to 12. Keep in mind I have an editable one on Page 5A {Option10} if you need a more comprehensive one.

Student Monthly Progress Report

17. General Weekly Planning Page (not homeschool planning but planning household).

Purpose of Form: This can be for a day planner or used in your planner if you want to plan other things besides your curriculum.

Free Weekly Planning General or Homeschool @ Tina's Dynamic Homeschool Plus

 NOW FULLY EDITABLE – General Weekly Planning Page

Weekly Planning General 2 - sample editable @ Tina's Dynamic Homeschool Plus sI heard ‘ya too on this form. NOW, the above General Weekly Planning Page is FULLY EDITABLE. It has a WHOPPING 74 boxes and spaces to fill in! You can buy it from this page or you can visit my Main Shop page which has all of my Planning Pages for purchase on one page. The above General Weekly Planning page where you write in by hand will stay Free!  You always decide here what works for your planner! And I will continue to make tiny, but helpful upgrades on my forms where possible.

Important: READ THIS FIRST .

Before you email me asking where your download link is or tell me that it is not working, read this to ensure that you get your pretties timely and that you don’t pay for something and not get it.

  • All my products are digital. You will not receive a physical product for anything in my store. A digital physical year calendar does not mean a physical product or calendar.
  • Downloads are INSTANT. When you pay, you will receive an email with a download link INSTANTLY. Depending on your internet connection, the email could be just 30 seconds or so, or a bit longer. The point is it will be soon, not a week later,etc.
  • The email with the download link will go to the email you used for paypal. If you used your husband’s paypal, your downloads will go to that email. Please check that email and your spam before emailing me telling me you can’t find it.
  • Hotmail and AOL can sometimes flag my email as SPAM no matter what you do. Though your order will be complete, your email provider can block my email from my store. You can create an account on my blog and download your order that way too.
  • Links are TIME SENSITIVE, meaning you need to download right then AND save to your computer. Please do not email me a week, two weeks or a month later telling me the “link is not working” because it has expired or because you did not save it to your device. I will not respond to those emails.
  • If a link is not “clickable” when you get your product download email, then copy/paste the link in your browser and your digital product will open.
  • Please put my email tina @ tinasdynamichomeschoolplus dot com in your address/contact list so that your product does not go to spam.

MY GUARANTEE: To treat you like I want to be treated which means I know at times technical problems may cause glitches, so I will do everything possible to make your experience here pleasant. I value your business and value you as a follower. I stand behind my products because they are actual products I use and benefit from too. Though I cannot refund purchases after you have been given access to them, I will do what I can to be sure you are a pleased customer.


  • Editable Weekly General Planning Page

    Editable Weekly General Planning Page

    $1.99
    Add to cart

18. Multiplication Chart to 20s.

Purpose of Form: Add to Student Planner or {uhmm..add to your planner..lol}

Multiplication Homeschool Chart | Tina's Dynamic Homeschool Plus   Multiplication Chart color
   

19. Field Trip Tracking Guide 20. Field Trip Planner

Purpose of Form: You can plan or track your field trips and by also tracking “what type” it gives you a glimpse of what types of field trips you have attended in the past years. At times we want to bring balance and I know for me I can’t remember exactly what types we have had in the past. If you want to bring balance to your educational objectives it lets you see this at a glance.

Homeschool Field Trip Form | Tina's Dynamic Homeschool Plus
Homeschool Field Trip Planning Form

HOW TO GET ALL THE FREE GRADING FORMS AND OTHER FORMS ON THIS PAGE

Now, how to grab the free homeschool grading, editable teacher and student schedule forms, field trip tracking form, general weekly planning forms and more. This is a subscriber freebie.

That means when you sign up to follow me, you get my emails in your inbox and you get this freebie.

1) CLICK HERE ON THIS LINK TO SIGN UP ON MY EMAIL LIST & TO GET THIS FREEBIE.

2) Grab the freebie instantly.

3) Last, look for all my emails in your inbox. Glad to have you following me!

If you need to Go Back:

Click Here for Step 1 Choose a Pretty Front & Back Cover.

Click Here for Step 2 Choose Calendars & Appointment Keepers

Click Here for Step 3  Choose Goals & Objectives

Click Here for Step 4 Choose Lesson Planning Pages

Click Here for Step 5A Just Unique Forms Just for You

When finished, click on the graphic to go to the next page.

 step-5c-of-the-7-step-free-homeschool-planner-tinas-dynamic-homeschool-plus

Save

Save

Save

Step 5a. Choose Unique Forms JUST for You

Step 5a choose unique forms just for you means you decide EACH year what forms your homeschool planner should and should not have.

 Step 5a Choose Unique Forms JUST for You

When finished, click on the graphic to go to the next page.

step-5b-of-the-7-step-free-homeschool-planner-tinas-dynamic-homeschool-plus

Attendance Forms, Journal Pages, Year Around Schedule | Tina's Dynamic Homeschool Plus

[Listing forms at the top of this page will help you to see more quickly what you want on this page and scroll down to find the number.]

1.Weekly Tracking/ 2.Attendance Charts/ 3.Year Around Homeschool Schedules/ 4.Curriculum Resource Checklist/ 5. Mission Statement/ 6.Curriculum Weekly Planning Forms/ 7.Reading Log/Reading List/ 8. Day at a Glance Forms/  9. Notes or Journal Pages/ 10.High School Planning Pages

Curriculum Pages for Planner Step 5a choose unique forms just for you

  Option 1 New Homeschooler Homework. Track Your Week FIRST. Don’t guess how to schedule.

Purpose of Form: To help you track your time and find the rhythm to your household. Scheduling needs to be on your timetable, not the rest of the homeschooling world.

This form works to track your time for a week for several purposes:

You might be new to homeschooling and need to “find” your rhythm. So it helps you to see where you place “items” on your day. Items are grocery shopping, laundry, rest time, work time, family time, etc.

Also this form is good if you need to track a diet, work or if your homeschooling day is broken up into chunks. It can help you to manage those times.

There is no need for anybody else to see this except you so that you can find where your “troubled” spots are. Print several and space throughout your planner so you can track your time anytime you feel you are falling behind.

Schedule Your Homeschool Week | Tina's Dynamic Homeschool Plus
Planning a Homeschool Week

  Option 2. Attendance Charts

Attendance Form Homeschool Planner Updated

Purpose of form: Track attendance. I have updated the attendance form, but have also kept my previous attendance forms below to give you more options.

Here is a graphic that explains both options, but read below as I explain about it too. My love for color has grown since my original Attendance Forms and my previous forms were in need of some color luv. 

The Attendance Forms were some of my first forms where I started adding a bit of color not knowing if you would like it or not. I had just started to move away from creating only black and white copies.

Here are a few details about the updated forms:

  • I have 2 options.
  • Both forms have a place for 4 children.  It is not that I have a fondness for the number four (tee hee hee) but that number of columns fits nicely on one page.
  • Both forms have an expanded Key Area. I added a few more codes too AND I created a few blank lines for codes that may be unique for your family and that you need to track.  You just write them in each year.
  • To allow room for the extra key code area because I was already at the bottom of the page, both forms had to be bumped up a bit.  It doesn’t affect binding or anything, I just wanted you to know that height wise it will be a bit taller than the rest of the forms in your planner.  I know, a small detail but those things matter when I create forms.
  • The biggest difference between the forms is that one has a blank area to fill in the month you begin school AND to fill in your semesters.   This allows for a lot more flexibility whether you begin tracking in May, June or July.  The other form follows all the rest of the forms on my 7 Step Homeschool Planner, which run from July to June (academic year) and allow for year around homeschooling.  On this form, the semesters are already filled in too.
Updated Attendance Chart 4 kids Academic Year Fill in Months thumb Updated Homeschool Attendance Forms

This one above you add in the months when you begin to homeschool and write in the semesters.

Updated Attendance Chart 4 kids Academic Year thumb Updated Homeschool Attendance Forms

This form matches the rest of my forms that begin on July and go through June for year around homeschooling and it has the months and semesters filled in already.

 The forms below here are my previous forms.

Academic Year. 3 Color Choices & 1 Form For An Only Child. Step 5a choose unique forms just for you

Purpose of form: Track Attendance. There are two choices here depending on how you schedule your school. The charts at the bottom are labeled across the top beginning with July to June to coincide with an academic year. The one chart at the bottom is labeled beginning with January to December if you do not follow the public school schedule but follow more of a physical year.

Even though we don’t have to keep attendance here in Texas, I do from time to time. I do this because I feel as a homeschool Leader, it keeps me accountable for my time I give to my family and to others. So if I need to ever check the “pulse” on my homeschooling journey, I add these in for the year. It especially becomes important to use for the high school years where you do want to keep up with attendance a little better.

Attendance Chart | Tina's Dynamic Homeschool Plus

This picture shows you how to use it in case all of those lines make you look at it sideways. One thing about forms is that they are no good to the user if the user doesn’t fully utilize their value. So here is a sample picture to explain how to use it. We made it real big so you can see it and explain how to use the chart below.

First, I made it so that you can use it with at LEAST 4 children or students on this one page.

(Note: I made a form for one child too if you prefer separate pages. We just like things streamlined. Too, if you have 5 or 6 children, you can still just use two pages.)

Second, each child’s name goes on the line that says student. You noticed I indicated that on the picture with a different color marker for each child.

Third, EACH day of EVERY month is divided on the chart into 4 columns. So one column for each child. The space is just big enough to either fill it in, check it for attendance or put the corresponding letter “S” for sick, “F” for Field Trip, etc.

Are you with me ?

Look at Aug. 1. You see the YELLOW Student 1 and the space for that student corresponds to the YELLOW space on that line. It is the same on that one day for each student.

So you get all 4 kids on one day using 4 columns.

Fourth, the gray lines where the black arrow is pointing to on the left side are there just to help you find your way across as you use it during the year. The gray lines using 5’s increment. So a gray line is on the 5th, 10th, 15th, 20th,etc. all the way down the page. Again, it is just so you do not get a headache navigating your way around the chart.

Once you download them, you will see how easy, they are to use.

Remember: Print Front/Back if you have more than 4 children.

with red lines


green lines

black lines academic year or physical year or for only one child.

Option 3. School Year Homeschool Planning Schedule following the {Academic Calendar}.

Purpose of this form: Plan your school year. Created using July to June Academic School year

One of the true gems of homeschooling is to be able to school year around. Look at the sample below to see how I highlighted the days we plan on schooling. I have taken off some in March, almost the complete month of April off, some in Nov and Dec, July and even June. Also I am keeping up with our schedule in both weeks and days. Our days we plan to school are highlighted in light yellow.

Why take ALL of your “Summer Break” in the summer? Take some in the spring, some in the fall or some in the summer.

You can download it under the sample picture to study it if you like to.

My Sample One Year To Show You How to Use Year Around Homeschool Schedule. Step 5a choose unique forms just for you

How a Homeschool Planning Calendar is Superior to a Regular Calendar

I have added an improved key to the bottom of the school around planning schedules. The above picture is at the bottom of the forms now. Goal is on there because that is what it is.

Don’t beat yourself up when it doesn’t match reality or achieved.  Mine never does each year and it won’t because we are imperfect and life happens. You can count on that. I know for me though, I meet way more goals than I ever would have if I had not planned.

Also I separated out Holidays from days off from school on the legend. For a lot of homeschoolers holidays do not always equal to a day off for various reasons. Homeschoolers come from a wide variety of backgrounds and I respect that. So this allows you to mark holidays so you know what is going on in the community but it may not necessarily be a day off from school for you.

The yellow indicates yellow highlighter and the blue indicates a blue highlighter. Something else that I added to the legend this year is to note the end of the 1st quarter, 1st semester, etc.

You may or may not want to use this but it helps me in noting those dates so that I can switch out unit themes or start another study like geography. Doing one subject like geography for one quarter and say art for another is how successful educators get “it all in”. I left those boxes blank because you may want to circle those dates, write them in, use a highlighter or use some other symbol.

Current Academic Year 2026 to 2027 Planning Your Year Form.

Grab the 2 Page Appointment Keepers here on Step 2.

Two color choices for Step 5a choose unique forms just for you.

School Year 2026-2027 Yearly Homeschool Schedule Free Form

Subscriber Freebie | You get both colors in one download. Grab them at this post School Year 2026-2027 Homeschool Calendar Schedule Beautiful Form

NEXT Academic Year 2027 to 2028 Planning Your Year Form.

Subscriber Freebie | You get both colors in one download. Grab them at this post School Year 2027-2028 Homeschool Calendar Schedule Beautiful Form

Grab the 2 Page Appointment Keepers here on Step 2.

Remember your Email IS your Password for the freebies. Add your email again even if you’re a follower already. Click on the link or graphic for the freebie, like you’re signing up again, but you’re not. You get the freebie INSTANTLY. No waiting.

3b. School Year Homeschool Planning Following the {Physical Year}.

    Current Physical Year 2026 & Next Physical Year 2027

Grab the Year 2026 Homeschool Planning Schedule Beautiful Form on this post

Grab the Year 2027 Homeschool Planning Schedule Beautiful Form on this post

Option 4. Curriculum Resource Checklist – Editable Too! Up to 4 Students on one page. You’re planning by the Academic Year.

Purpose of Form. Can you remember which resource is for which child during which term? This form should be used in your planner to help you see which resources you will be using with which child and for which term. {keep it straight ma’am}

In addition, because you might not use the same resources for the 1st semester as you would the 2nd semester or even each quarter, this is NOT called a YEARLY Curriculum Resource Checklist.

The very name “year” implies one does not have flexibility or that you are “locked’ in to using the same resources or curriculum for the whole year.

If you find that the same resources will be used for your whole school year, simply type in the current school year.

Look at my example here that is in my planner for the first part of Jan. 2011. It is only for the 2nd semester. These were not all the same resources I used for the WHOLE year.  This reminds me of what I will be using this next period to finish up our school year.

In other words, you will need at least 1 per child and more if you switch around in the year. Me? I normally have 2 per child or 1 per semester per child.

Curriculum Resources
Curriculum Resources List

Above My Sample Copy for You to Visualize.

      Editable for you.

Option 5. Mission Statement.

Purpose of Form: Put into words what you want at the beginning, middle and end of this journey. Every year some things will change and some things will not. Highlighting what your goals are each year will keep them fresh in your mind and help you to navigate your way.

Homeschool Mission

Turquoise Mission

Homeschool Goals and Mission

Red and Gray Mission

Option 6. Weekly Planning
3 Color Choices and 1 Black/White.

 Purpose of Form: This is a weekly glance (that means brief notes if you want to plan a week ahead.

 Why is this not a weekly glance at my home, my whole life and my school form? That is what a family calendar is for that is in a place for all the family members to see.

 This form was designed only for planning your school. Some people may think that its more organized to have your whole life on one planner. It may be if you aren’t homeschooling. Organizing and homeschooling is a slightly different lifestyle. The fact is that you do control your school time and you do not need to clutter up your curriculum planner. You should know ahead of time before you plan school that week that you have a Dr’s appointment, field trip, etc and that is noted on your form for that purpose only.

Step 5a choose unique forms just for you,

 Because some people may need to see a big picture of school for the week these forms give you a place to glance. Because my planner is daily, some of you might choose to have weekly glances.

 Also another tip for this form is that you can plan one week ahead and if you arrive at that week and prefer to do something different, then just write something different in your daily lesson plan.

 Think of the weekly planning page as a “blue print” of what is to come or what perhaps you planned but did not accomplish. Just like the daily planning page, erasing is NOT encouraged. It is just a “plan” remember. Surrender to it and plan. Go back and make notes. It is for “planning” not lesson making.

 There are small boxes on the form so that you can go back and check off what you actually accomplished and this may help you plan more efficiently to see what you planned versus what was actually accomplished.

Weekly Planning

 Note: The colors on these Weekly Planning pages coordinate with the Notes/Journal Pages below.{keep it pretty too} There is enough variety that they will match with any cover as I used “bars of colors” like the sample above.

So each Weekly Planning pages have the bars of colors AND you can choose either the bar of squares or bars of dots. Mix and match and have fun! Not quite as fun as shopping for a diamond ring, but almost.  I included a black and white copy too.

Homeschool Weekly Planning Page

black and white dots

Black and white homeschool Planning Page | Tina's Dynamic Homeschool Plus

black and white squares

Multi color homeschool planning page
Weekly Planning Page | Tina's Dynamic Homeschool Plus

Option 7 Reading Logs.

Almost as fun as shoe shopping because there are 7 color options to choose from. Choose one color for each child or divide it up by term.

Purpose of Form: To List and Track Reading of Each Child.

A short personal story here: When I started homeschooling I pored over a book written by Irene Fountas and Gay Su Pinnell. It was about how to teach reading and it listed books by genre. As wonderful as it was in helping me to see I needed a balanced reading program, I learned that I didn’t need to know how to teach reading to 30 children only my 3.{quit stressing} So I put the book aside but remembered the wonderful key they used to classify books by and have used it since I started homeschooling. I have incorporated that key, which is a code to the types of genre, in this form.

Even though the key is intended to be used up through 6th grade, I believe it has merit all the way through school. How many of us know how to classify genre?

Once you and your child become familiar with the key or genre overview sheet below, it will be easy to code your reading.

The follow Genre Overview is from Irene C. Fountas and Gay Su Pinnell Reading Logs found here.

 Fiction Genre

CodeGenreDefinition
TLTraditional LiteratureStories that are passed down from one group to another in history. This includes folktales, fables, fairy tales and myths from different cultures. 
 FFantasyA story including elements that are impossible such as talking animals or magical powers. Make-believe is what this genre is all about. 
 SF Science FictionA type of fantasy that uses science and technology (robots,time machines,etc)
RFRealistic FantasyA story using made-up characters that could happen in real life.
HFHistorical FictionA fictional story that takes place in a particular time period in the past. Often the setting is real, but the characters are made up form the author’s imagination.
 MMysteryA suspenseful story about a puzzling event that is not solved until the end of the story.

HTML Tables

Nonfiction Genre

CodeGenre  Definition
 IInformationalTexts that provide facts about a variety of topics (sports, animals, science, history, careers, travel, geography, space, weather,etc)
B BiographyThe story of a real person’s life written by another person.
ABAutobiography The story of a real person’s life that is written by that person. 
PPoetry{note: this is really “other genre” but for sake of organization I am putting this genre here.} Poetry is verse written to create a response of thought and feeling from the reader. It often uses rhythm and rhyme to help convey its meaning. 

HTML Tables

About how to use the form:{it may be easier to download the form below as I explain it to you} Once you and your child become familiar with the above table, then it’s easy to use the form. I did put the key at the top of the form for easy reference; Then select either Fiction or Nonfiction then put the code in the box.

At the bottom of the form for each book is a way to track reading. “Ch” represents Chapters. Simply check off the chapter number as your child goes along reading each chapter or have them do it. This makes it easy to glance and see where child is in their reading instead of trying remember in your head or ask them each time.

In addition, if there are more chapters than listed {30 are on the form} there is a blank grid below to fill in. Also you may want to just use the bottom blank grid and keep up with the chapters by using 2’s, 3’s, or 5’s. Use the blank grid if need be to customize how you want to track.

Also, because some books are just “way out there” on the number of chapters they have, you can simply fill in the number of pages. {My oldest son just read one that had 80 chapters – who puts that many chapters in a book? It happens and it was an informational book. Each chapter was only like 5 pages long because they quickly switched topics} In that case you can just use “Number of Pages” and fill in Date/Started and Date/Completed. The form was designed for any age reader and flexibility.

blue Homeschool Reading Log | Tina's Dynamic Homeschool Plus

This is only one sample page. I have 7 color choices.

They match the weekly planning pages above.

Option 8. Day at a Glance

Purpose of Form: Some big picture people feel comfort in writing things down in more than one place and need to see it all.

I have created a few forms to help them along but encourage you to divide it out. Use a Home Management Binder and a visual central command center in your kitchen or other area that is used by all of your family members to see. I believe that simplifies tasks, but again to help you along I created a few forms so you don’t give up all your creature comforts as you learn to organize.

I am putting what I call my “classic” or original forms here because I had many requests for them when I took them down to do an updo to this  form.

Remember your Email IS your Password for the freebies. Add your email again even if you’re a follower already. Click on the link or graphic for the freebie, like you’re signing up again, but you’re not. You get the freebie INSTANTLY. No waiting.

Option 9. Journal Pages or Notes.

 7 Color Options. STEP 5a Choose Unique Forms Just for You

Note: These journal pages match in color to the weekly planning pages above in Number 6. Instead of putting a picture of all 8 pages, look above at Number 6 to see your favorite colors then download the same journal page below or mix and match.

Tina's Dynamic Homeschool Plus

Option 10. Middle and High School Planning.

Purpose of Form: Help Plan High School and determine your grading scale. Also after driving courses and to get your teens on your insurance some providers give you a discount if your student has good grades. I had to prepare progress reports midterm to show my sons’s grades.

Sample of How to Use Editable Progress Report

Editable Progress Report Card here.

I did want to share this picture with though it’s a tad bit out of focus. Tiny was on the other end but I do kid friendly pictures.  But, this was the day Mr. Senior 2013 finally got his driver’s license.  What a patient kid when all of that stuff hit us while I was in the middle of teaching him to drive.

After that jubilant day, the fun day came for insurance. The insurance company gives a discount for good grades in school and needed a current progress report. Oh yippee, I needed another form and figured you would need one like this too sometime or the other.

Since I need something a little more official looking than the pretty progress report  (Option 16) I already have on the site, which is basically used to satisfy reporting for those that live in countries/states like this, I put this report together. It really acts as our final report card and it is editable. It worked just perfectly when I sent it to our insurance guy. The only parts not editable are the comments and the signature which are normally done hand written.

4 Yr High School Plan

Planning Homeschool High School Graduation | Tina's Dynamic Homeschool Plus

Course for Graduation & Credit Planning

How to Grab All The Free Lesson Planning Pages Here on STEP 5a Choose Unique Forms Just for You

Finally, how to grab the free lesson planning pages. It’s a subscriber freebie.

 1) Sign up on my list.
2) Download the freebies now – instantly
3) Glad to have you following me!

step-5b-of-the-7-step-free-homeschool-planner-tinas-dynamic-homeschool-plus

If you need to Go Back:

Click for Step 1 Choose a Pretty Front & Back Cover.

Step 2 Choose Calendars & Appointment Keepers

Step 3  Choose Goals & Objectives

Step 4 Choose Lesson Planning PagesSave

Save

Save

  • « Go to Previous Page
  • Page 1
  • Interim pages omitted …
  • Page 85
  • Page 86
  • Page 87
  • Page 88
  • Page 89
  • Interim pages omitted …
  • Page 91
  • Go to Next Page »

Primary Sidebar

Footer

Privacy Policy | About Me | Reviews | Contact | Advertise

Categories

Archives

Tina Robertson is a participant in the Amazon Services LLC Associates Program, an affiliate advertising program designed to provide a means for sites to earn advertising fees by advertising and linking to amazon.com. As an Amazon Associate, I earn from qualifying purchases.

Copyright © 2026 · 5 TNT LLC · Log in · Privacy Policy